Embroidery has always been a beautiful way to express creativity through thread. But with the rise of embroidery machines, the game has changed completely. Now, intricate designs can be stitched out with the push of a button. The secret behind these perfectly sewn patterns? Embroidery digitizing.
Whether you’re a total beginner or looking to take your skills to the next level, this guide will walk you through everything you need to learn embroidery digitizing—from the basics to pro-level tips. Let’s dive in and make embroidery digitizing easy to understand and even easier to start!
What Is Embroidery Digitizing?
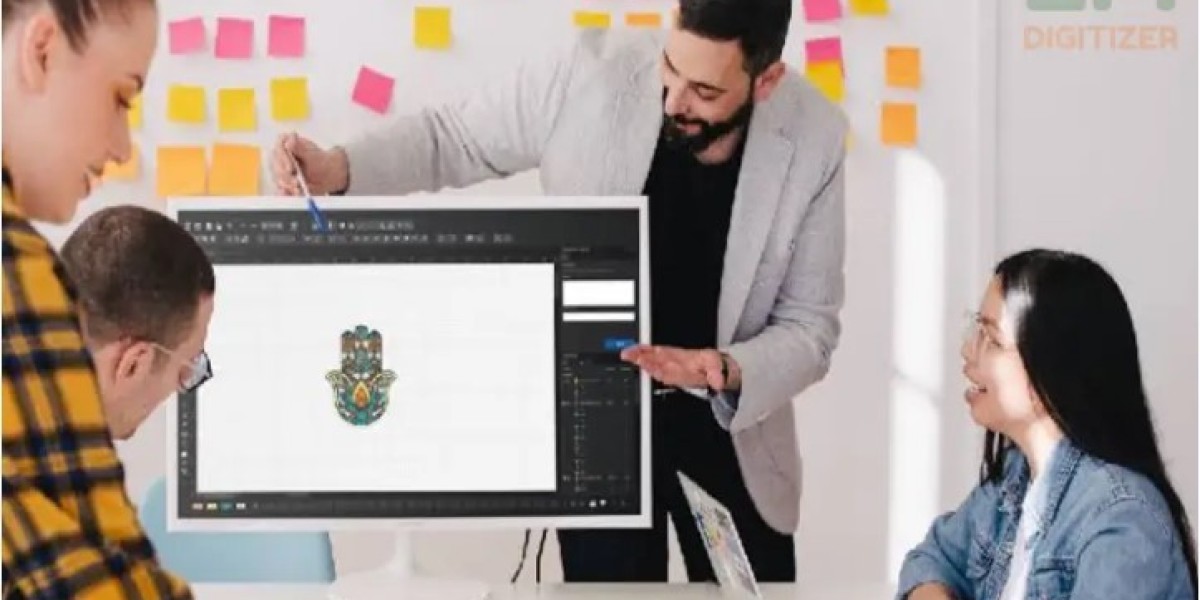
Embroidery digitizing is the process of converting a piece of artwork—like a logo, sketch, or image—into a digital file that an embroidery machine can read and stitch. The digitized file tells the machine exactly how to sew the design: which stitches to use, where to place them, what direction they should go, and when to change thread colors.
It's not the same as just saving an image in a different format—digitizing is more like “translating art into thread.”
Why Is Digitizing Important?
You can’t just upload a JPEG or PNG to your embroidery machine and expect it to start stitching. Machines need specific file formats like DST, PES, or EXP, and these files must contain stitch instructions—not pixels.
Proper digitizing ensures:
- Clean lines and smooth curves
Sharp text, even when small - The right stitch density and direction
- Consistency across garments and materials
In short, digitizing makes your design stitchable.
The Basic Steps of Digitizing
Let’s break it down into a simple, beginner-friendly process.
1. Import Your Artwork
Start with a clean, high-resolution image—ideally in PNG, JPG, or SVG format.
2. Prepare the Artwork
Simplify the design if needed. Remove gradients, reduce unnecessary details, and separate elements by color.
3. Assign Stitch Types
Using digitizing software, map different areas of the design to stitch types:
- Satin stitch for borders and text
- Fill (Tatami) stitch for large areas
- Running stitch for outlines or detail work
4. Set Stitch Directions
Define how the thread moves through each shape to create texture and structure.
5. Adjust Density and Pull Compensation
These settings help prevent fabric puckering or distortion by balancing thread tension.
6. Add Color Changes and Trims
Specify when to switch threads and where to trim excess thread automatically.
7. Save in the Right Format
Export your file to match your machine type: PES (Brother), DST (Tajima), JEF (Janome), etc.
What Software Do You Need?
There are many digitizing programs out there, ranging from beginner to professional level. Here are some popular options:
Hatch Embroidery Software
Best for hobbyists and pros alike. Offers full digitizing features and a user-friendly interface.
Wilcom Embroidery Studio
Industry standard for professionals. Extremely powerful but has a learning curve.
Embird
Modular and affordable with powerful features. Great for small businesses.
SewArt
Budget-friendly and beginner-friendly. Good for basic conversions and edits.
PE-Design (Brother)
Works specifically with Brother machines. Ideal for PES file creation.
Want to skip the learning curve? Many people choose professional digitizing services for high-quality results—especially for business logos or detailed designs.
File Formats: What You Need to Know
Different embroidery machines require different file types. Here's a quick guide:
File Type | Machine Brand | Description |
PES | Brother, Babylock | Most common for home users |
DST | Tajima, many commercial machines | Universal, colorless format |
JEF | Janome | Used by Janome embroidery machines |
EXP | Melco, Bernina | Compact commercial format |
VP3 | Husqvarna, Pfaff | Used by specific European brands |
Always confirm which format your machine uses before starting any digitizing project.
Understanding Key Digitizing Concepts
If you’re ready to move beyond the basics, here are some pro concepts to help you digitize like a master:
Underlay Stitches
These stitches are laid beneath the top layer to stabilize the fabric and improve design sharpness. There are edge run, center walk, and zigzag underlays.
Push and Pull Compensation
As thread is stitched, it moves slightly. Compensating for this avoids distortion, especially on stretchy fabrics.
Stitch Density
Too dense and the fabric bunches up; too sparse and the fill looks patchy. Balancing density is key to pro results.
Tie-in and Tie-off
These tiny stitches secure the thread at the beginning and end of each section to avoid unraveling.
What Makes a Digitized File “Good”?
A well-digitized file should:
- Sew without thread breaks
- Stitch smoothly with no jumps or gaps
- Have minimal trims and color changes
- Look clean and professional—even on complex garments like hats or jackets
Great digitizing can make a low-res logo look amazing in thread. Poor digitizing? It can turn even a great design into a stitching disaster.
Don’t Want to Do It Yourself? Use a Pro!
While it’s totally possible to learn digitizing on your own, it can take time, effort, and software costs. If you need a design stitched fast—or need it done right the first time—professional digitizing services are the way to go.
Recommended: Digitizing Buddy
Digitizing Buddy offers:
- Fast turnarounds (4–12 hours)
- Affordable pricing
- Support for all major file formats
- Clean, machine-ready results
- Unlimited edits until you're 100% satisfied
Whether you’re an Etsy seller, hobbyist, or apparel brand, Digitizing Buddy makes embroidery digitizing truly easy.
Tips for Better Embroidery Results
Use Clean Artwork
Avoid low-resolution images, blurred edges, or cluttered designs.
Choose the Right Stabilizer
Stabilizers prevent fabric from stretching or puckering—critical for good results.
Do a Test Sew-Out
Always test your file on scrap fabric before stitching the final garment.
Mind the Fabric
Adjust stitch types and densities depending on whether you’re using denim, cotton, fleece, or mesh.
Keep It Simple
Fewer colors and cleaner lines often lead to better-looking embroidery.
Real-Life Applications of Digitizing
Here’s how embroidery digitizing is used every day:
- Company logos on hats and shirts
- Personalized gifts with names or monograms
- Team uniforms with mascots and player names
- Merchandise for online shops
- Home décor like towels, pillows, and linens
Whether you’re designing for business, family, or fun, digitizing is at the heart of machine embroidery success.
Final Thoughts: Start Digitizing with Confidence
Embroidery digitizing doesn’t have to be intimidating. Once you understand the basics—and maybe even explore some advanced techniques—you’ll be well on your way to creating beautiful, stitch-ready designs.
Want to jump in but avoid the learning curve? Let a professional like Digitizing Buddy handle the technical side, so you can focus on creating and stitching.